
AI Worker x Nav2
Overview: What You Will Learn
This post is a practical guide for engineers building autonomous navigation on ROS2 Nav2. It starts from the basic setup and walks through designing your own navigation strategies.
Key Knowledge You Will Gain
- Understanding Nav2 Basics: How the Nav2 stack is structured and what each core server does.
- Implementing Basic Navigation (RPP): Set up a stable baseline using the Regulated Pure Pursuit controller.
- Holonomic Drive Potential: Why holonomic (crab) drive matters for omnidirectional robots and how it changes maneuverability.
- Creating Your Own Strategy (BT Customization): How to extend Nav2’s Behavior Tree to encode custom navigation logic.
System Architecture
- Architecture Overview
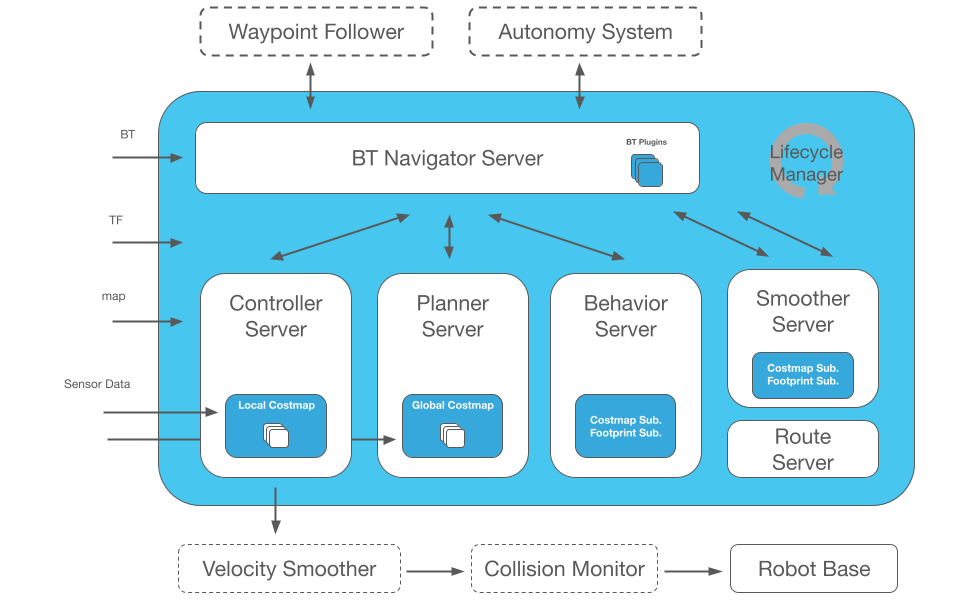
Nav2 stack with planning, control, smoothing, recovery, and BT-based coordination.
Servers at a glance
- Map Server: Publishes the static map so planners, costmaps, and localization share a common world frame.
- Planner Server: Computes a collision-aware global path from start to goal using the configured global planner plugin.
- Controller Server: Generates real-time velocity commands by following the active path with the configured local controller plugin.
- Smoother Server: Makes the planned path smoother by reducing sharp corners and wobbly sections, leading to better robot motion.
- Behavior Tree Navigator: Executes the BT that sequences planning, control, and recovery behaviors for each goal.
- Recovery Server: Supplies standard recovery actions (clear costmaps, spin, replan) when progress or localization is lost.
- Lifecycle Manager: Manages node lifecycle states (configure/activate/deactivate/cleanup) and can restart components if they fail.
Implementing Basic Navigation with RPP
To provide fundamental and stable driving capabilities, we start with the Regulated Pure Pursuit (RPP) controller as the default.
INFO
What is RPP?
- RPP is a widely used, reliable geometric path-tracking algorithm that gives a stable baseline without heavy optimization.
- Path Tracking: Looks ahead to a point on the path and computes curvature to steer smoothly (lookahead driving).
- Regulation: Automatically reduces linear velocity on sharp curves or near obstacles for stable turning.
- Kinematic Constraint: Assumes Differential Drive; outputs only forward (
v_x) and yaw (w_z), ignoring lateral (v_y).
RPP Performance
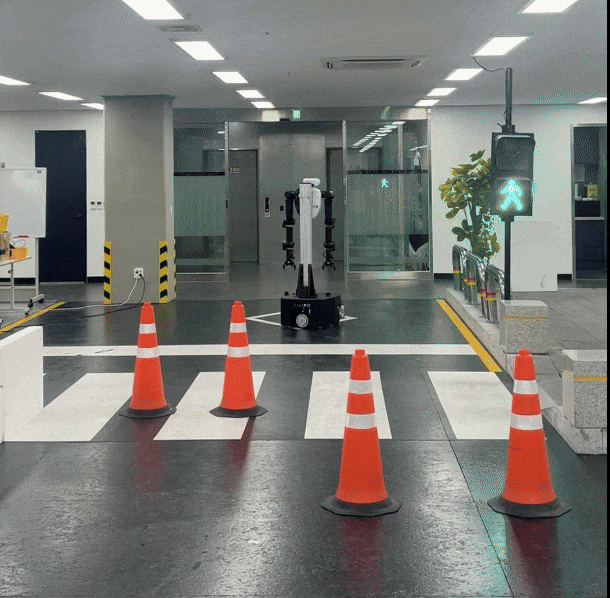
You can see the robot smoothly following curved paths and moving stably toward the goal.

RPP parameters example — click to expand
# Example controller_server.yaml (RPP)
controller_server:
  ros__parameters:
    FollowPath:
      plugin: "nav2_regulated_pure_pursuit_controller::RegulatedPurePursuitController"
      desired_linear_vel: 0.5
      lookahead_dist: 0.4
      min_lookahead_dist: 0.4
      max_lookahead_dist: 0.6
      lookahead_time: 2.0
      rotate_to_heading_angular_vel: 2.0
      use_velocity_scaled_lookahead_dist: false
      min_approach_linear_velocity: 0.1
      approach_velocity_scaling_dist: 0.4
      use_collision_detection: true
      max_allowed_time_to_collision_up_to_carrot: 1.0
      use_regulated_linear_velocity_scaling: true
      use_fixed_curvature_lookahead: false
      curvature_lookahead_dist: 0.25
      use_cost_regulated_linear_velocity_scaling: false
      cost_scaling_dist: 0.3
      cost_scaling_gain: 1.0
      regulated_linear_scaling_min_radius: 0.9
      regulated_linear_scaling_min_speed: 0.25
      use_rotate_to_heading: true
      allow_reversing: false
      rotate_to_heading_min_angle: 0.785
      max_angular_accel: 2.0
      min_distance_to_obstacle: 0.0
      stateful: true
Key Parameters Explained
While RPP exposes many parameters, the core driving behavior is shaped by a few fundamentals:
Basic Driving & Lookahead
desired_linear_vel(0.5 m/s): Target max linear speed on straights.lookahead_dist(0.4 m): How far ahead the controller aims. Larger = smoother but wider turns; smaller = tighter tracking but possible oscillation. (Withuse_velocity_scaled_lookahead_dist=false, this stays fixed.)
Speed Regulation
use_regulated_linear_velocity_scaling(true): Enables automatic slowing on sharp curves.regulated_linear_scaling_min_radius(0.9 m): Radius threshold to start decelerating on tight turns.regulated_linear_scaling_min_speed(0.25 m/s): Floor speed during regulation to avoid stalling.
Rotation-to-Heading & Safety
use_rotate_to_heading(true): If starting heading deviates from the path, rotate in place before moving.rotate_to_heading_angular_vel(2.0 rad/s): Spin speed for that alignment.use_collision_detection(true): Basic stop-if-obstacle detection using the costmap.
Holonomic Drive Capabilities
RPP is a great default for stability, but if your robot has mecanum or swerve drive, you can achieve significantly better efficiency by using true holonomic motion. For that, we chose MPPI as the controller.
Holonomic Advantage
- Heading and motion can be decoupled; the robot can slide sideways or move diagonally without first turning.
- Agility in confined spaces: slide laterally through tight aisles instead of multi-point turns.
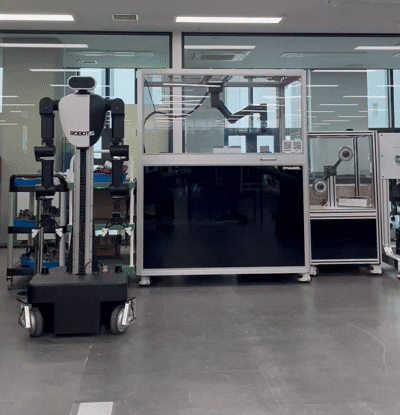
RPP (Ackermann style) must yaw first before edging sideways, so tight approaches add extra arc distance.
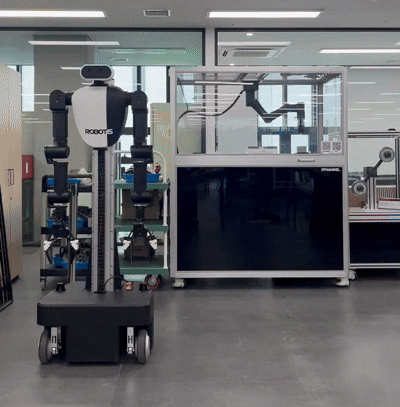
MPPI Holonomic keeps heading independent from translation, using crab slides for short hops to the goal with fewer corrections.
Holonomic control shines at short range: crab motion trims turning time and keeps the robot efficient in narrow spots
Why MPPI for Holonomic?
Nav2 offers multiple holonomic-capable controllers (e.g., DWB, TEB), but MPPI is highly flexible: by mixing critics (scoring functions that evaluate paths) and motion models you can change driving style without touching the core algorithm.
INFO
What is MPPI? (Model Predictive Path Integral)
- Simulate: From the current state and motion model (e.g., Omni), MPPI samples thousands of future trajectories.
- Score: Critic functions evaluate goal progress, obstacle clearance, smoothness, etc.
- Execute: The weighted average of top samples becomes the next velocity command.
This cycle repeats rapidly, producing smooth, adaptive control.
MPPI parameter example — click to expand
controller_server:
  ros__parameters:
    controller_frequency: 30.0
    FollowPath:
      plugin: "nav2_mppi_controller::MPPIController"
      time_steps: 56
      model_dt: 0.05
      batch_size: 2000
      vx_std: 0.2
      vy_std: 0.2
      wz_std: 0.4
      vx_max: 0.5
      vx_min: -0.35
      vy_max: 0.5
      wz_max: 1.9
      ax_max: 3.0
      ax_min: -3.0
      ay_min: -3.0
      ay_max: 3.0
      az_max: 3.5
      iteration_count: 1
      temperature: 0.3
      gamma: 0.015
      motion_model: "Omni"
      visualize: false
      reset_period: 1.0 # (only in Humble)
      regenerate_noises: false
      TrajectoryVisualizer:
        trajectory_step: 5
        time_step: 3
      TrajectoryValidator:
        plugin: "mppi::DefaultOptimalTrajectoryValidator"
        collision_lookahead_time: 2.0
        consider_footprint: false
      AckermannConstraints:
        min_turning_r: 0.2
      critics: ["ConstraintCritic", "CostCritic", "GoalCritic", "GoalAngleCritic", "PathAlignCritic", "PathFollowCritic", "PathAngleCritic", "PreferForwardCritic"]
      ConstraintCritic:
        enabled: true
        cost_power: 1
        cost_weight: 4.0
      GoalCritic:
        enabled: true
        cost_power: 1
        cost_weight: 5.0
        threshold_to_consider: 1.4
      GoalAngleCritic:
        enabled: true
        cost_power: 1
        cost_weight: 3.0
        threshold_to_consider: 0.5
      PreferForwardCritic:
        enabled: true
        cost_power: 1
        cost_weight: 5.0
        threshold_to_consider: 0.5
      CostCritic:
        enabled: true
        cost_power: 1
        cost_weight: 3.81
        critical_cost: 300.0
        consider_footprint: true
        collision_cost: 1000000.0
        near_goal_distance: 1.0
        trajectory_point_step: 2
      PathAlignCritic:
        enabled: true
        cost_power: 1
        cost_weight: 14.0
        max_path_occupancy_ratio: 0.05
        trajectory_point_step: 4
        threshold_to_consider: 0.5
        offset_from_furthest: 20
        use_path_orientations: false
      PathFollowCritic:
        enabled: true
        cost_power: 1
        cost_weight: 5.0
        offset_from_furthest: 5
        threshold_to_consider: 1.4
      PathAngleCritic:
        enabled: true
        cost_power: 1
        cost_weight: 2.0
        offset_from_furthest: 4
        threshold_to_consider: 0.5
        max_angle_to_furthest: 1.0
        mode: 0
Key Parameters Explained
motion_model: "Omni": tells MPPI to simulate omnidirectional moves.vy_max / vy_min: must be non-zero to actually command lateral velocity.- Critic tuning for holonomic use:
PreferForwardCritic: disable or set very low weight to allow sideways motion.PathAlignCritic: reduce/disable to decouple heading from path direction.GoalAngleCritic: keep moderate to align final heading without over-constraining mid-path strafing.CostCritic: ensure it stays enabled to respect obstacles while allowing lateral detours.PathFollowCritic: keep enabled to stay near the path but balance with relaxed alignment for crab motion.
Crafting Your Own Strategy with Behavior Trees
Nav2's Behavior Tree (BT) is the core logic layer that dictates the robot's decision-making process. By customizing this BT, you can move beyond standard behaviors and define your own unique navigation strategies tailored to your specific mission. I’ll show how I modified the BT to build my path-length–aware driving strategy so you can use it as a reference.
Hybrid Static Strategy (Path-Length Based)
Pick the driving mode before motion starts, based on the total length of the planned global path:
- Long path (Cruising): If the goal is far, favor stable, car-like motion for the whole trip.
- Short path (Precision): If the goal is near, favor agile holonomic motion (sideways/diagonal moves).
TIP
Standard Nav2 lacks a condition node to classify path length, so we add one via a custom C++ BT node. If the capability you need already exists as a Nav2 BT plugin, use it; if not, create a custom node as shown here.
Implementing a Path-Length Switch in the BT
- The Logic (Condition Node)
Class inherits from BT::ConditionNode and checks if the plan length is under a threshold.
// is_path_length_under.cpp (simplified)
BT::NodeStatus IsPathLengthUnder::tick() {
  nav_msgs::msg::Path path;
  if (!getInput("path", path)) return BT::NodeStatus::FAILURE; // read from BT blackboard

  double total_length = 0.0;
  for (size_t i = 0; i + 1 < path.poses.size(); ++i)
    total_length += distance(path.poses[i], path.poses[i+1]);

  double threshold;
  getInput("distance_threshold", threshold);

  return (total_length <= threshold) ? BT::NodeStatus::SUCCESS
                                     : BT::NodeStatus::FAILURE;
}- Plugin Registration
Add the registration macro in the same C++ file so BT Navigator can load the node from the built shared library.
// Plugin registration
BT_REGISTER_NODES(factory) {
  factory.registerNodeType<nav2_behavior_tree::IsPathLengthUnder>(
    "IsPathLengthUnder");
}- Behavior Tree Wiring (XML)
Use aReactiveFallbackto choose the controller based on path length.
<ReactiveFallback name="SwerveModeSelector">
  <Sequence name="ShortDistanceLogic">
    <IsPathLengthUnder distance_threshold="2.0" path="{path}"/>
    <FollowPath path="{path}" controller_id="OmniController"/>
  </Sequence>
  <Sequence name="LongDistanceLogic">
    <FollowPath path="{path}" controller_id="CurveController"/>
  </Sequence>
</ReactiveFallback>
How the BT picks a controller (runtime flow)
- Planner writes the global path to the BT blackboard.
INFO
What is BT Blackboard?
The blackboard is shared memory inside the BT where nodes read and write shared data (e.g., the global path). It avoids ROS topic overhead between BT nodes during decision-making.
- BT Navigator ticks
IsPathLengthUnder; SUCCESS if path ≤ threshold, else FAILURE. - The reactive fallback selects the matching branch and passes the chosen
controller_id(OmniControllerorCurveController). - BT Navigator sends the goal with that
controller_idto the Controller Server, which runs the corresponding MPPI instance.
Visual representation of the Hybrid Strategy BT logic flow

Dual-Controller Configuration
Goal: Holonomic agility for tight spaces and fine positioning.
Key Critics:
- PreferForwardCritic: disabled (sideways/backward allowed).
- GoalAngleCritic (w=5.0): align final heading for interaction tasks.
- PathFollowCritic (w=5.0): stay near the path without forcing heading alignment.
Goal: Stability and efficiency over distance; minimize lateral wobble.
Key Critics:
- PathAlignCritic (w=14.0): penalizes heading vs. path direction error.
- PreferForwardCritic (w=9.0): favors forward velocity over sliding.
- PathAngleCritic (w=6.0): smooths sharp curvature ahead.
INFO
Want to try this MPPI example? In navigation.launch.py, set params_file to navigation_mppi.yaml instead of navigation.yaml.