
Navigation
This guide shows how to bring up the AI Worker's navigation stack so the robot can move autonomously after basic setup.
Prerequisites
- Complete the hardware and setup steps in the Setup Guide.
- Ensure the robot is on level ground with sufficient clearance for safe autonomous driving.
- Connect to the robot PC (keyboard/monitor or SSH) and make sure the battery is charged.
Bring Up the Robot
Before launching Nav2, start the follower using the commands from the Teleoperation Guide. Run these inside the Docker container:
cd ~/ai_worker
./docker/container.sh enterNote that sg2 model is used as an example.
ros2 launch ffw_bringup ffw_sg2_follower_ai.launch.pyOr use the shortcut:
ffw_sg2_follower_aiKeep these terminals running. Use a new terminal for the commands below.
View RViz in Local
On the User PC, open a terminal and enter the ai_worker Docker container:
cd ~/  # or your preferred directory
git clone -b jazzy https://github.com/ROBOTIS-GIT/ai_worker.git
cd ai_worker
./docker/container.sh enter
Start RViz with the navigation configuration file:
rviz2 -d ~/ros2_ws/src/ai_worker/ffw_navigation/rviz/navigation.rvizWARNING
Make sure the ROS_DOMAIN_ID in the User PC Docker container matches the ROS_DOMAIN_ID used by the AI Worker robot. If the domain IDs are different, RViz will not receive robot topics such as /scan.
On the User PC, check that /scan data is being received:
ros2 topic echo /scanLidar Scan Visualization
First, use RViz to confirm lidar scans are visible around the robot.
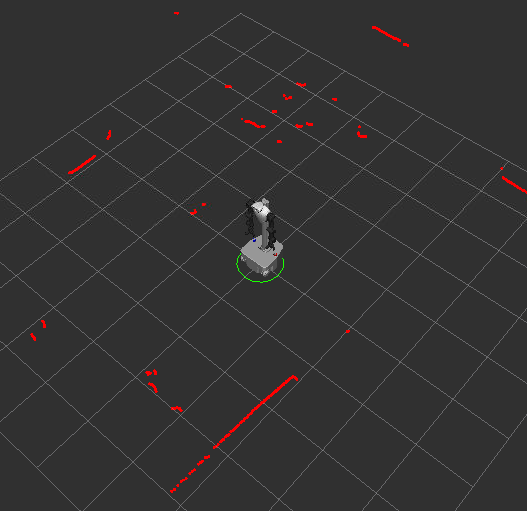 Lidar scan values visualized in RViz. Use this view to confirm the sensor is publishing correctly.
WARNING
In RViz, set the scan topic Reliability Policy to Best Effort for this display.
Launch the Navigation Stack
All commands below run on the robot PC in a new terminal after the bringup above is running.
Enter the Docker container in the new terminal:
bashcd ~/ai_worker ./docker/container.sh enterStart Nav2:
WARNING
Make sure the bringup terminals stay running before launching Nav2, otherwise the navigation stack will fail to connect to sensors and actuators.
The package includes only a default Gazebo map. Create your own map with SLAM Toolbox for your environment.
Build a map with SLAM Toolbox:
bashros2 launch ffw_navigation navigation.launch.py use_slam:=trueNav2 starts with SLAM enabled so you can map while driving. Pick one of the two exploration methods below:
- Autonomous: In RViz, send a goal with
2D Goal Pose. the robot will plan, drive, and expand the map as it moves. - Keyboard teleop: In a new terminal, run:bashDrive with the keyboard to explore and build the map.
cd ~/ros2_ws/src/ai_worker/ffw_teleop/ffw_teleop python3 mobile_teleop.py
View Mapping in RViz
On the
User PC, open a new terminal and enter theai_workerDocker container:bashcd ~/ai_worker ./docker/container.sh enterStart RViz with the mapping configuration file:
bashrviz2 -d ~/ros2_ws/src/ai_worker/ffw_navigation/rviz/mapping.rvizUse this RViz view to monitor the map, lidar scan, robot pose, and navigation status while SLAM mapping is running.
SLAM Mapping Process
 White areas show free space discovered by SLAM, black indicates obstacles or walls, and gray is unknown space. As the robot drives, the explored (white) region expands and the unknown area shrinks while the map is refined.
Save a generated map
On the
Robot PC, if you ran SLAM and want to reuse the map, save it with:bashcd ~/ros2_ws/src/ai_worker/ffw_navigation/maps ros2 run nav2_map_server map_saver_cli -f ./mapThis produces
map.yamlandmap.pgmin themapsdirectory. Change the path with-f /path/to/map_nameif needed.- Autonomous: In RViz, send a goal with
Navigation Using a Saved Map
- Use a generated map:bash
ros2 launch ffw_navigation navigation.launch.pySet the initial pose in RViz withTIP
To use a different map, place your
map.yamland image file in themaps/folder of theffw_navigationpackage.2D Pose Estimateso AMCL can localize. After Nav2 is running, send a goal in RViz using2D Goal Pose. The robot will plan and drive to the target pose. if SLAM is enabled, the map updates in real time.
View Saved Map Navigation in RViz
On the User PC, open a new terminal and enter the ai_worker Docker container:
cd ~/ai_worker
./docker/container.sh enter
Start RViz with the navigation configuration file:
rviz2 -d ~/ros2_ws/src/ai_worker/ffw_navigation/rviz/navigation.rvizRViz Goal on Saved Map
 Setting
 2D Goal Pose in RViz on a saved map. the plan is sent to the real robot for execution.
Real-World Execution
 AI Worker following the planned curved path on the saved map and driving to the goal.
Troubleshooting
- If the
/scandisplay is missing in RViz, set thescantopic Reliability Policy toBest Effort. - If the map is not visible in RViz, set the map topic Durability Policy to
Transient Local.
Tuning Guide
- AMCL localization: Adjust parameters in
config/amcl_localization.yaml. - Nav2 stack (costmaps, BT navigator, controller, planner): Adjust parameters in
config/navigation.yaml. - For detailed parameter descriptions across Nav2, see https://docs.nav2.org/index.html.
Safety and Usage Tips
- Keep people and obstacles clear while the robot is localizing or moving.
- If you need to pause, use RViz to clear goals or stop the navigation nodes with
Ctrl+Cin the running terminals. - For simulation-based testing (recommended before field deployment), see the Nav2 section in Gazebo.