
HX5-D20 Tactile Feedback Grasping
Full Demo
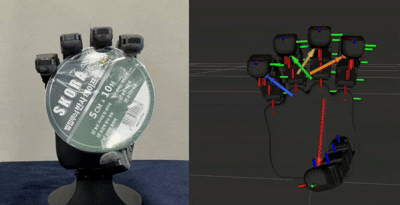
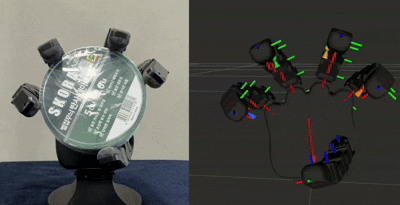
This video demonstrates tactile sensor visualization, force-based grasping, optimization-based correction, and stable grasping across different object shapes.
1. Overview
This project implements tactile feedback grasping for the HX5-D20 using ROS 2. The HX5-D20 has five fingers, and each finger includes a 3×3 tactile sensor layout. Instead of using a single scalar contact signal, this system uses all nine tactile values from each finger.
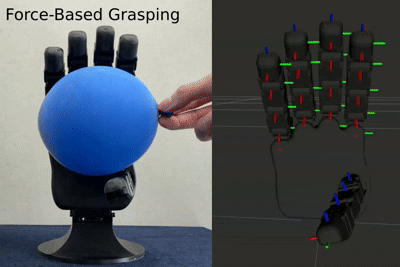
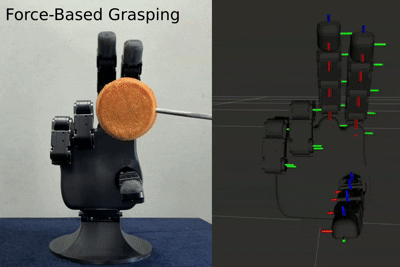
The main controller described in this guide is the Force-Based Grasping controller, implemented as tactile_force_controller. It closes the fingers until contact is detected, stores the contact force, and then maintains a stable grasp force using tactile feedback.
The project also includes an Optimization-Based Grasping controller. This advanced controller uses the Center of Pressure (CoP) from each 3×3 tactile array to estimate contact direction and apply correction planning with an IK solver.
The core idea is simple:
- The pressure broadcaster publishes each finger's 3×3 tactile sensor values.
- The tactile sensor module parses the raw pressure array and applies baseline compensation and filtering.
- The force-based controller detects contact and stores the initial contact force.
- The controller switches to HOLD mode and regulates the grasp force.
- The final output is a whole-hand
JointTrajectorycommand.
Key Packages and File Structure
The force-based grasping path mainly uses:
tactile_force_controller.cpp: Force-based grasping state machine, trajectory publisher, HX5-D20 hand initialization, and ROS 2 parameter declaration/loading.tactile_sensor.cpp: Tactile parsing, baseline compensation, EMA(Exponential Moving Average) filtering, and total force calculation.tactile_rviz.cpp: RViz tactile force marker visualization.grasp_start_publisher.py: Keyboard trigger for/grasp_start.matplot_visualize_tactile.py: 3×3 tactile heatmap visualization.
2. System Architecture
The tactile grasping system is organized around the following main components:
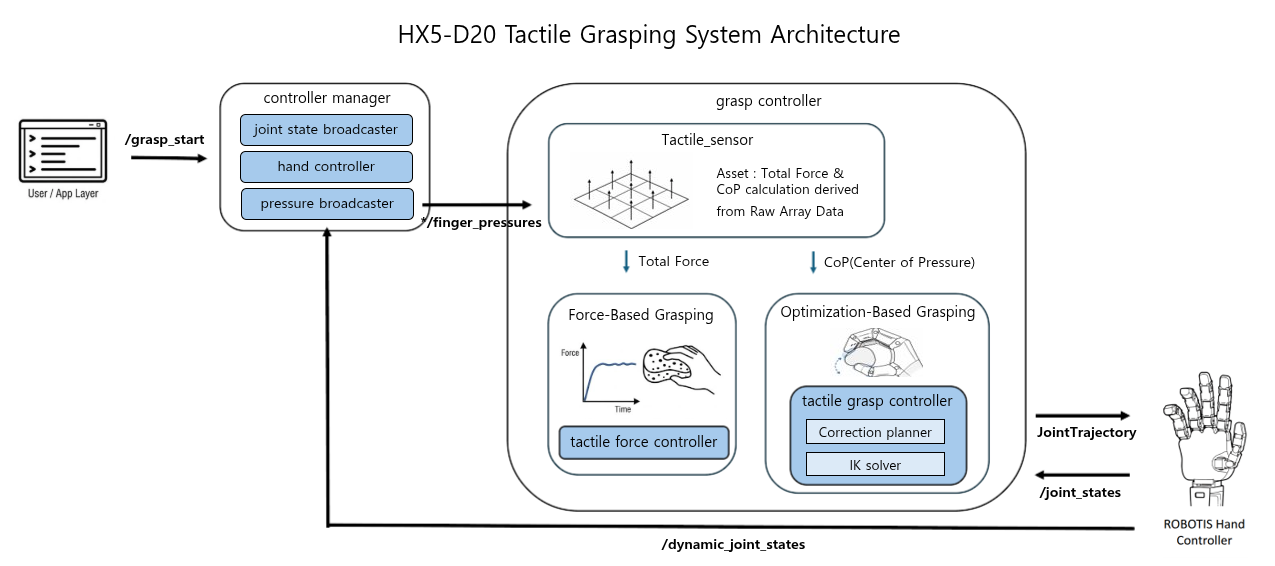
- User/App Layer: Sends the /grasp_start command to start or reset the tactile grasping sequence.
- Pressure Broadcaster: Collects raw tactile sensor data from the HX5-D20 and publishes each finger’s 3×3 pressure array to the /right_hand/finger_pressures topic.
- Tactile Sensor: Parses the incoming finger pressure topic, organizes the 3×3 tactile values for each finger, builds the initial baseline, applies filtering, and computes tactile features such as total force and CoP.
- Force-Based Grasping: Performs force-based grasping by using each finger’s total tactile force to detect contact, close the hand, and maintain a stable grip force.
- Optimization-Based Grasping: Performs CoP-based optimization grasping by using the pressure distribution of the 3×3 tactile array to estimate contact bias, plan correction motions, and adjust the grasp through IK-based finger control.
3. Start Guide
Step 1: Environment Setup & Build
# 1. Clone RobotisHand Repository
cd ~
git clone https://github.com/ROBOTIS-GIT/robotis_hand.git

# 2. Enter Docker Container
cd ~/robotis_hand/docker
./container.sh start
./container.sh enter
Step 2: Bring Up the HX5-D20
Launch the ROBOTIS hand hardware bringup first. The launch file must be selected depending on which hand is being used (right or left).
Tactile grasping and visualization are available only on real hardware.
ros2 launch robotis_hand_bringup hx5_d20_right.launch.pyTo visualize the force arrows in RViz, enable RViz from the hand bringup launch file. In the bringup launch.py, change the start_rviz launch argument default value from false to true:
ros2 launch robotis_hand_bringup hx5_d20_right.launch.py start_rviz:=trueStep 3: Run Force-Based Tactile Grasping
Before running the controller, check robotis_hand_playground/config/param.yaml and set hand_side to match the hand you brought up:
tactile_force_controller:
  ros__parameters:
    # Use "right" for HX5-D20 right hand, "left" for HX5-D20 left hand.
    hand_side: "right"
Run the force-based controller and RViz tactile marker node:
ros2 launch robotis_hand_playground tactile_force_controller_launch.pyStep 4: Start and Stop Grasping
Open another terminal and run the keyboard trigger node:
ros2 run robotis_hand_playground grasp_start_publisher.pyThe keyboard helper publishes /grasp_start commands:
| Key | Command |
|---|---|
z | Start grasping by publishing /grasp_start: true. |
x | Reset to the initial open posture by publishing /grasp_start: false. |
TIP
For reliable contact detection, place the object so each finger touches the 3×3 tactile sensor area as evenly as possible. Ellipsoid-shaped objects are recommended for broad fingertip contact.
You can also publish manually:
ros2 topic pub --once /grasp_start std_msgs/msg/Bool "{data: true}"To stop and reset:
ros2 topic pub --once /grasp_start std_msgs/msg/Bool "{data: false}"4. Parameter Guide
The main parameters are stored in:
robotis_hand_playground/config/param.yaml4.1 Common Parameters
| Parameter | Default Example | Description |
|---|---|---|
control_hz | 20.0 | Main controller loop frequency. |
trajectory_dt | 0.05 | Time interval of the published trajectory point. |
close_step | 0.01 | Joint closing step used during Hand CLOSE. |
contact_threshold | 30.0 | Total force threshold for contact detection. |
thumb_contact_ratio | 2.0 | Multiplier for the thumb contact threshold. |
hand_side | right | Selects right or left hand joint names and topics. |
un_use_finger | [0] | Selects unused fingers. 0 means all fingers are used. |
4.2 Force-Based Grasping Parameters
| Parameter | Default Example | Description |
|---|---|---|
reactive_force | 1.2 | Desired force multiplier after initial contact. |
state | HOLD | Behavior after contact. Use HOLD to maintain force. |
state: HOLD
After contact is detected, the controller maintains the contact force.
state: IDLE
After contact is detected, the controller stops immediately.
4.3 Unused Finger Setting
un_use_finger uses a 1-based finger index:
0: use all, 1: thumb, 2: index, 3: middle, 4: ring, 5: little
Example: disable the ring and little fingers.
un_use_finger: [4, 5]When a finger is configured as unused, the controller treats it as already contacted and excludes it from normal force regulation.
4.4 Initial Hand Posture
The initial open posture of the HX5-D20 is defined in tactile_force_controller.cpp.
The right-hand and left-hand initial postures are defined separately:
init_r_positions: Initial joint positions for the right hand.init_l_positions: Initial joint positions for the left hand.
If you want to change the starting or reset posture of the hand, modify the corresponding array depending on the target hand side.
When /grasp_start receives false, the controller resets the hand using these initial position values.
5. Visualization Tactile Sensor
The project provides two visualization tools: RViz force marker visualization and Matplotlib 3×3 tactile heatmap visualization.
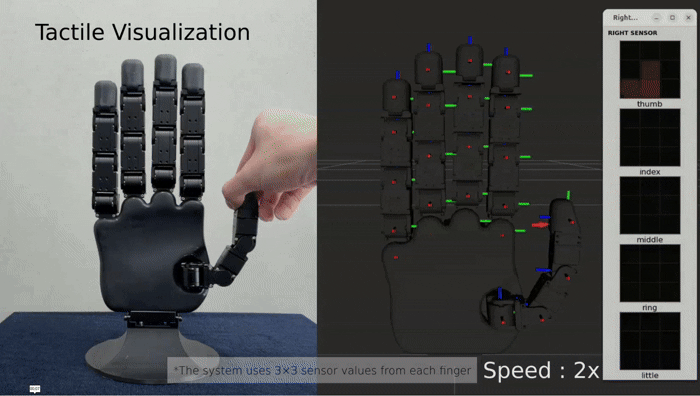
5.1 RViz Tactile Marker Visualization
The tactile_rviz node visualizes tactile force information as markers in RViz. This is useful for checking whether each finger receives pressure and whether the tactile direction or force arrow changes correctly.
Set hand_side to match the hand model you are using (right or left). The default value is right.
ros2 run robotis_hand_playground tactile_rviz --ros-args -p hand_side:=rightThe marker visualization is useful for demonstrations because it directly shows that the robot is using tactile sensor feedback during grasping.
5.2 (Optional) 3×3 Tactile Heatmap Visualization
The heatmap script visualizes the 3×3 tactile values for each finger.
Install the optional dependencies before running the Matplotlib visualizer:
sudo apt update
sudo apt install -y python3-matplotlibros2 run robotis_hand_playground matplot_visualize_tactile.pyThis tool is useful for checking the raw distribution of tactile pressure. Each finger is shown as a 3×3 grid, and the intensity changes based on the baseline-subtracted pressure value.
6. Software Design Details
6.1 Tactile Sensor Module
The tactile sensor module is separated from the controller logic so that both the force-based controller and the optimization-based controller can reuse the same sensor processing pipeline.
The tactile message flow is:
robotis_interfaces/msg/HandPressures
└── sensors[]
    └── robotis_interfaces/msg/TactileSensor
        ├── sensor_name
        ├── pressure_names[9]
        └── pressure_values[9]
The module handles:
- Tactile message validation.
- 3×3 tactile array parsing.
- Baseline collection.
- Baseline subtraction.
- EMA(Exponential Moving Average) filtering.
- Total force update.
The total force is calculated as the sum of the nine filtered tactile values:
total_force = pressure_1 + pressure_2 + ... + pressure_9This modular design makes it easier to add other tactile controllers later.
6.2 Force-Based Grasping Algorithm
The force-based controller uses tactile force feedback to close the hand, detect contact, and keep a stable grip.
| Step | Description |
|---|---|
| Baseline calibration | Stores no-contact tactile values as the baseline. |
| Contact detection | Closes each finger until its force value reaches the contact threshold. |
| Desired force setting | Sets the target grasp force using the detected contact force and reactive_force. |
| Force regulation | Opens or closes the finger slightly based on the difference between target force and current force. |
| Trajectory output | Publishes the final command as a trajectory_msgs/msg/JointTrajectory message. |
The grasp sequence is controlled by the /grasp_start topic. When /grasp_start receives true, the controller starts grasping. When it receives false, the controller resets the hand to the initial open posture and returns to IDLE.
6.3 Force Controller State Machine
The force controller follows a simple IDLE → CLOSE → HOLD state machine:
| State | Description |
|---|---|
IDLE | Waits for /grasp_start. |
CLOSE | Closes the fingers until tactile contact is detected. |
HOLD | Maintains the target force using tactile feedback. |
/grasp_start false
        ↓
      IDLE
        ↓ /grasp_start true
      CLOSE
        ↓ all active fingers contacted
      HOLD
        ↓ /grasp_start false
      IDLE + reset posture
This structure keeps the grasping behavior predictable and easy to debug.
7. Advanced: Optimization-Based Grasping
INFO
Official source code for the optimization-based grasping controller is not provided. This section explains the core idea behind contact estimation and correction motion.
The force-based controller mainly uses the total force from each finger. However, the tactile sensor contains more information than total force. Since each finger has a 3×3 tactile array, the pressure distribution can also show where the contact is located on the fingertip.
The optimization-based grasping controller uses this distribution through the Center of Pressure (CoP).
7.1 Center of Pressure from 3×3 Tactile Array
The Center of Pressure (CoP) represents the weighted center of the contact pressure on the fingertip. Each HX5-D20 fingertip has a 3×3 tactile array, so the controller can estimate not only how strong the contact is, but also where the contact is located.
For each finger, the CoP is calculated from the pressure value and grid position of each tactile cell.
cop_x = sum(pressure_i × x_i) / sum(pressure_i)
cop_y = sum(pressure_i × y_i) / sum(pressure_i)
If the pressure is evenly distributed, the CoP stays near the center of the tactile pad. If the object touches only one side of the fingertip, the CoP moves toward that side. This makes it possible to detect contact bias before the grasp becomes unstable.
| CoP Position | Meaning |
|---|---|
| Center area | Contact is balanced on the fingertip. |
| Left or right area | Contact is biased along the X direction. |
| Top or bottom area | Contact is biased along the Y direction. |
7.2 Why CoP Is Useful
A force-based controller can measure how strongly the finger presses the object, but it cannot tell where the contact is located on the fingertip. Two contacts can have similar total force while one is centered and the other is biased toward an edge.
CoP adds this missing contact-location information. By estimating whether the pressure is centered, left-biased, right-biased, top-biased, or bottom-biased, the controller can adjust the finger posture and move the contact point closer to the center of the tactile pad.
7.3 CoP-Based Correction Direction
The tactile pad is divided into a center region and outer correction regions. If the CoP stays inside the center region, the controller keeps the current grasp. If the CoP moves outside the center region, the controller generates an X or Y correction command.
| CoP Bias | Correction |
|---|---|
X_LEFT / X_RIGHT | Move the contact toward the X-axis center. |
Y_TOP / Y_BOT | Move the contact toward the Y-axis center. |
The controller does not react to a single tactile value. It uses the full 3×3 pressure distribution to estimate contact imbalance and choose the correction direction.
7.4 Region-Based X/Y Correction
The region-based correction result can be visualized separately for X-axis and Y-axis correction. The following layout leaves space for the correction GIFs.
X-Axis Correction
X correction moves left- or right-biased contact back toward the center region.
Y-Axis Correction
Y correction moves top- or bottom-biased contact back toward the center region.
7.5 Correction Planner and Planar IK Solver
The optimization-based controller is composed of the following logic:
tactile_grasp_controller: Grasping state machine and CoP correction logic.correction_planner: Multi-step correction planning.finger_ik_solver: Planar IK solver for fingertip correction.tactile_sensor: Shared tactile processing module.
The correction planner converts the selected CoP correction direction into a staged motion. For X-axis correction, the controller first releases the finger slightly, shifts the lateral joint, and then re-grasps the object. This prevents the finger from dragging the object too strongly while changing the contact position.
For Y-axis correction, the controller uses the planar IK solver. Instead of directly adding a fixed joint angle, the solver treats the correction as a small fingertip motion. It first estimates the current fingertip pose, applies a small displacement in the local fingertip frame, and then converts that target motion into joint target updates.
This keeps the correction closer to the actual contact behavior on the tactile pad, while still respecting the joint limits.
7.6 Optimization-Based Grasping Flow
The optimization-based grasping flow is:
- Read the 3×3 tactile pressure grid from each finger.
- Calculate the CoP to estimate where contact is located on the fingertip.
- Check whether the contact point is biased away from the center.
- Generate a correction direction and correction step.
- Convert the fingertip correction into joint commands through the IK solver.
- Repeat the feedback loop until the contact becomes more balanced.
This method is useful when the grasp needs more than simple force maintenance, especially when the object contact is biased on the fingertip.