
Model Workflow
This guide explains the process of training and deploying imitation learning models for the AI Worker using your prepared datasets.
Model Training
INFO
You can train the policy either on your local PC or on an NVIDIA Jetson AGX Orin device.
After preparing your dataset, you can proceed to train the policy model.
Training on NVIDIA Jetson AGX Orin
1. Enter the Docker Container
Open a terminal on the Jetson device and enter the Docker container:
cd ai_worker
./docker/container.sh enter
2. Navigate to the LeRobot Directory
cd /root/ros2_ws/src/physical_ai_tools/lerobot3. Train the Policy
Execute the following command to start training:
python lerobot/scripts/train.py \
  --dataset.repo_id=${HF_USER}/ffw_test \
  --policy.type=act \
  --output_dir=outputs/train/act_ffw_test \
  --job_name=act_ffw_test \
  --policy.device=cuda \
  --log_freq=100 \
  --save_freq=1000
👉 Key Training Parameters
| Parameter | Description |
|---|---|
--dataset.repo_id | The Hugging Face dataset ID you created in the data collection step |
--policy.type | Model architecture to use (e.g., 'act' for Action Chunking Transformer) |
--output_dir | Where to save model checkpoints and logs |
--job_name | Name of the training run (useful for tracking) |
--policy.device | Device to use for training ('cuda' for GPU, 'cpu' for CPU) |
--log_freq | How often to log training statistics (in iterations) |
--save_freq | How often to save model checkpoints (in iterations) |
👉 Expected Training Output
During training, you will see output like this:
INFO 2025-05-28 12:12:40 ts/train.py:232 step:200 smpl:2K ep:3 epch:0.16 loss:7.490 grdn:154.502 lr:1.0e-05 updt_s:0.047 data_s:0.002
INFO 2025-05-28 12:12:48 ts/train.py:232 step:400 smpl:3K ep:7 epch:0.33 loss:3.128 grdn:85.109 lr:1.0e-05 updt_s:0.041 data_s:0.000
INFO 2025-05-28 12:12:57 ts/train.py:232 step:600 smpl:5K ep:10 epch:0.49 loss:2.615 grdn:74.954 lr:1.0e-05 updt_s:0.041 data_s:0.000
INFO 2025-05-28 12:13:05 ts/train.py:232 step:800 smpl:6K ep:13 epch:0.65 loss:2.331 grdn:68.764 lr:1.0e-05 updt_s:0.042 data_s:0.000
INFO 2025-05-28 12:13:14 ts/train.py:232 step:1K smpl:8K ep:16 epch:0.81 loss:2.075 grdn:64.323 lr:1.0e-05 updt_s:0.042 data_s:0.000
INFO 2025-05-28 12:13:22 ts/train.py:232 step:1K smpl:10K ep:20 epch:0.98 loss:1.903 grdn:61.364 lr:1.0e-05 updt_s:0.042 data_s:0.000
INFO 2025-05-28 12:13:31 ts/train.py:232 step:1K smpl:11K ep:23 epch:1.14 loss:1.716 grdn:57.887 lr:1.0e-05 updt_s:0.042 data_s:0.001
INFO 2025-05-28 12:13:40 ts/train.py:232 step:2K smpl:13K ep:26 epch:1.30 loss:1.558 grdn:54.819 lr:1.0e-05 updt_s:0.041 data_s:0.000
INFO 2025-05-28 12:13:48 ts/train.py:232 step:2K smpl:14K ep:29 epch:1.47 loss:1.454 grdn:53.859 lr:1.0e-05 updt_s:0.042 data_s:0.000
...
Training on Your PC
1. Set Up the LeRobot Framework
First, follow the LeRobot installation instructions to set up the framework locally.
2. Transfer Your Dataset to Your Local Machine
Use scp to copy the dataset directory from the Robot PC to your local machine:
scp -r ~/ai_worker/docker/huggingface/lerobot/${HF_USER}/ffw_test/ <USER>@<IP>:/home/.cache/huggingface/lerobot/${HF_USER}/INFO
- Replace ${HF_USER} with your Hugging Face username.
- Replace ffw_test with the actual dataset repository ID.
<USER>and<IP>refer to your local machine’s SSH credentials.
3. Train the Policy
Once the dataset has been transferred, you can train a policy using the following command:
python lerobot/scripts/train.py \
  --dataset.repo_id=${HF_USER}/ffw_test \
  --policy.type=act \
  --output_dir=outputs/train/act_ffw_test \
  --job_name=act_ffw_test \
  --policy.device=cuda \
  --log_freq=100 \
  --save_freq=1000
Training time depends on your hardware and dataset size, but typically ranges from several hours to a full day.
(Optional) Uploading Checkpoints to Hugging Face
To upload the latest trained checkpoint to the Hugging Face Hub:
huggingface-cli upload ${HF_USER}/act_ffw_test \
  outputs/train/act_ffw_test/checkpoints/last/pretrained_model
This makes your model accessible from anywhere and simplifies deployment.
Model Inference
Once your model is trained, you can deploy it on the AI Worker for inference.
1. Change File Ownership
INFO
This step must be performed on the robot PC, not inside the Docker container.
sudo chown -R robotis ./Move your model folder from your local PC to the model directory on the Robot PC using scp.
scp -r <your model folder's directory> robotis@<your robot's serial number>.local:~/ai_worker/docker/lerobot/outputs/train2. Open a Terminal and Enter Docker Container
cd ai_worker
./docker/container.sh enter
3. Launch the ROS 2 Follower Node
# For bg2 type
ffw_bg2_follower_ai
# For sg2 type
ffw_sg2_follower_ai
4. Run Inference
You can choose one of the following methods to run inference:
Option 1Web UI (Recommended) Option 2
LeRobot CLI (Optional)
Option 1. Web UI
a. Launch Physical AI Server
WARNING
If the Physical AI Server is already running, you can skip this step.
Open a new terminal and enter the Docker container:
cd ai_worker
./docker/container.sh enter
Then, launch the Physical AI Server with the following command:
ai_serverb. Open the Web UI
Open your web browser and open the Web UI (Physical AI Manager).
(Refer to the Dataset Preparation > Web UI > 3. Open the Web UI)
On the Home page, select the type of robot you are using.

c. Enter Task Instruction and Policy Path
Go to Inference Page.
Enter Task Instruction and Policy Path in the Task Info Panel, located on the right side of the page.
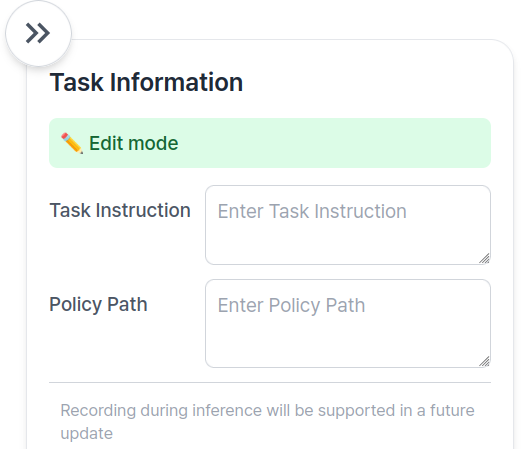
👉 Task Information Field Descriptions
| Item | Description |
|---|---|
| Task Instruction | A sentence that tells the robot what action to perform, such as "pick and place object". |
| Policy Path | The absolute path to your trained model checkpoint directory. This should point to the folder containing your trained model files such as config.json, model.safetensors, and train_config.json. (e.g., /root/trained_model/ffw_act/pretrained/). |
INFO
Recording during inference will be supported in a future update. Coming soon!
d. Start Inference
To begin inference, use the Control Panel located at the bottom of the page:

- The
Startbutton begins inference. - The
Finishbutton stops inference.
Option 2. LeRobot CLI
a. Open a New Terminal and Run Docker Container
cd ai_worker
./docker/container.sh enter
b. Navigate to the LeRobot Directory
cd /root/ros2_ws/src/physical_ai_tools/lerobotc. Run the Following Command for Evaluation
python lerobot/scripts/control_robot.py \
  --robot.type=ffw \
  --control.type=record \
  --control.single_task="pick and place objects" \
  --control.fps=15 \
  --control.repo_id=${HF_USER}/eval_ffw_test \
  --control.tags='["tutorial"]' \
  --control.episode_time_s=20 \
  --control.reset_time_s=10 \
  --control.num_episodes=10 \
  --control.push_to_hub=true \
  --control.policy.path=outputs/train/act_ffw_test/checkpoints/last/pretrained_model \
  --control.play_sounds=false
👉 Key Inference Parameters
| Parameter | Description |
|---|---|
--control.type=record | Records the policy performance for later evaluation |
--control.policy.path | Path to your trained model checkpoint |
--control.episode_time_s | Duration of each inference episode (in seconds) |
--control.repo_id | Hugging Face repo where evaluation results will be saved |
Visualizing Inference Results
After running inference, you can visualize the results using the same visualization tool used for datasets:
python lerobot/scripts/visualize_dataset_html.py \
  --host 0.0.0.0 \
  --port 9091 \
  --repo-id ${HF_USER}/eval_ffw_test
Then open http://127.0.0.1:9091 in your browser to see how your model performed.
TIP
If you have a another device connected to the same network as the host machine, open http://ffw-{serial number}.local:9091 in your browser to see how your model performed.
For example, http://ffw-SNPR48A0000.local:9091.
Troubleshooting
- Out of memory errors: Try reducing the batch size with
--train.batch_size=16or lower - Low performance: Consider collecting more diverse training data or increasing training duration
- Robot not responding: Ensure the follower node is running and communication is established
- Training divergence: Check your dataset quality and try decreasing the learning rate