Setup Guide
This guide will walk you through the process of setting up your AI Worker hardware and software environment.
Hardware Setup
(*The term Follower refers to the body of the AI WORKER robot)
Note: Please check the type of robot you are using.
FFW-BG2
Powering On the FFW_BG2 follower
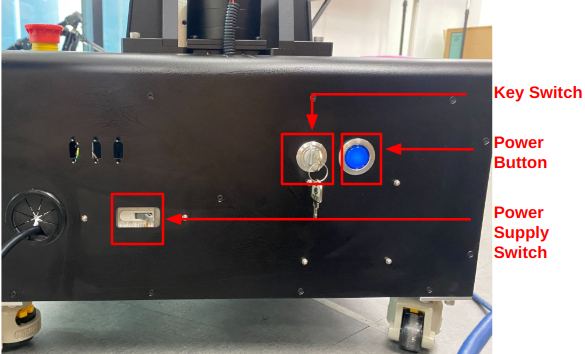
- Toggle the
Power Supply Switchto the right. - Insert the
Key Switchand turn it to the 12 o'clock position. - Press and hold the
Power Buttonfor 3 seconds. When you hear a beep, the system is powered on. (You should see the robot’s head light up at this point.)
Hardware Ports (FFW_BG2 Follower)
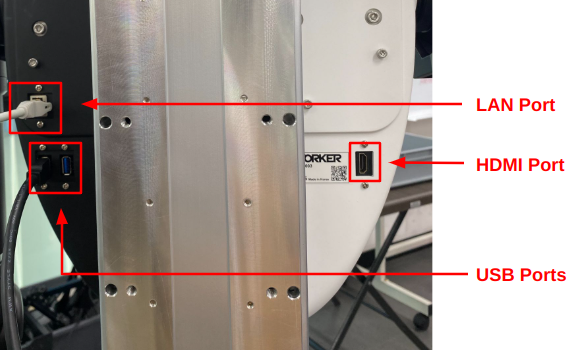 The back of the Follower body includes several ports for system access and external connections. These include:
LAN Port: Used to access the robot PC via SSH or remote desktop.USB Ports: For connecting peripherals such as a keyboard, mouse, or USB drive.HDMI Port: Allows direct video output for connecting a monitor.
FFW-SG2
Powering On the FFW_SG2 follower
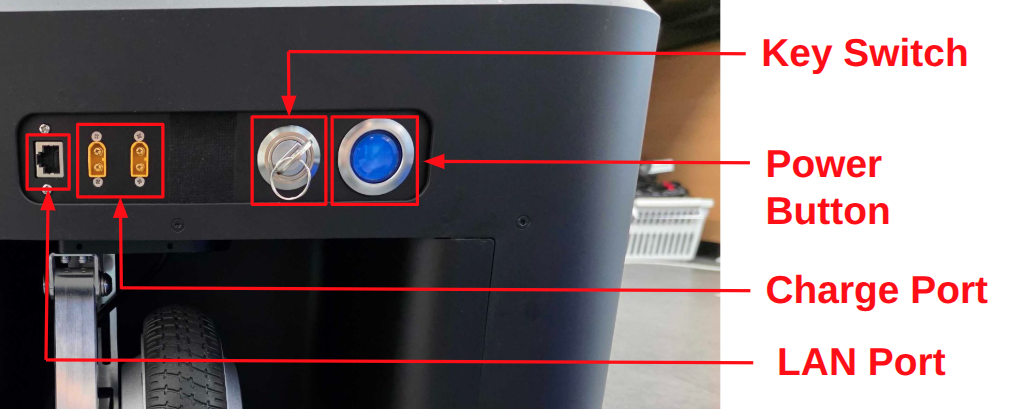
- Insert the
Key Switchand turn it to the 12 o'clock position. - Press and hold the
Power Buttonfor 3 seconds. When you hear a beep, the system is powered on. (You should see the robot’s head light up at this point.)
Hardware Ports (FFW_SG2 Follower)
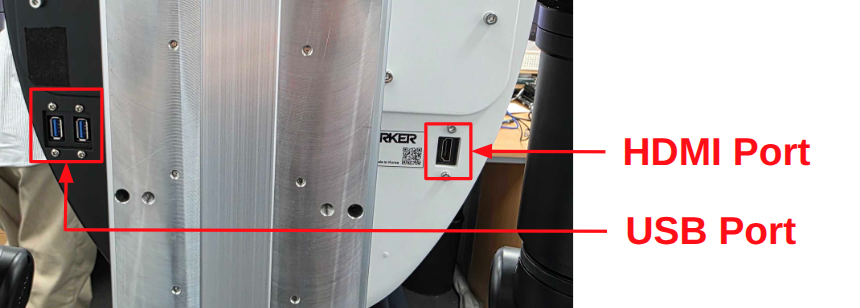 The back of the Follower body includes several ports for system access and external connections. These include:
LAN Port: Used to access the robot PC via SSH or remote desktop.USB Ports: For connecting peripherals such as a keyboard, mouse, or USB drive.HDMI Port: Allows direct video output for connecting a monitor.Charge Port: Used for battery charging.
Software Setup
AI WORKER relies on two main repositories:
- ai_worker: Provides support for controlling DYNAMIXEL actuators using ros2_control and enables teleoperation functionality.
- physical_ai_tools: A set of tools for imitation learning, including data collection, training, model inference, and visualization utilities.
The software setup instructions below are intended for development on a user PC. Note that the robot PC on the AI WORKER is already pre-configured with the same setup.
Prerequisites
- Operating System: Ubuntu environment
(The AI WORKER software runs inside a Docker container based onUbuntu 24.04 (ROS 2 Jazzy). Therefore, the Ubuntu version of the user PC does not need to match and is not critical.) - Container Engine: Docker Engine
- Follow the official Docker installation guide
- Complete the post-installation steps
- Required steps:
- Install Docker Engine using the repository method
- Add your user to the docker group
- Enable Docker to start on boot
- Verify installation with
docker run hello-world
- Version Control: Git
- Graphics Support:
- NVIDIA Graphics Driver
(In Docker-based environments, the container is generally isolated from the host system. However, the graphics driver version on the host can have a direct impact on performance and compatibility—especially when using GPU acceleration. We recommend using the following driver version(s) for best results)- Install
nvidia-driver-570-server-openforCUDA 12.8 - Verify installation with
nvidia-smi
- Install
- NVIDIA Container Toolkit
- Follow the official installation guide
- Required steps:
- Configure the production repository
- Install
nvidia-container-toolkit - Configure Docker runtime using
nvidia-ctk - Restart Docker daemon
- For detailed configuration, see the Docker configuration guide
- NVIDIA Graphics Driver
Configuration
Docker Volume Management
The Docker container uses the following volume mappings for data persistence and hardware access:
volumes:
  # Hardware and System Access
  - /dev:/dev                    # Hardware device access
  - /tmp/.X11-unix:/tmp/.X11-unix:rw  # X11 display
  - /tmp/.docker.xauth:/tmp/.docker.xauth:rw  # X11 authentication

  # Development and Data Storage
  - ./workspace:/workspace       # Main workspace directory
  - ../:/root/ros2_ws/src/ai_worker/  # AI Worker source code
  - ./lerobot/outputs:/root/ros2_ws/src/physical_ai_tools/lerobot/outputs  # Model outputs
  - ./huggingface:/root/.cache/huggingface  # Hugging Face cache
⚠️ Important: Data Persistence
- Container data is volatile and will be lost when the container is removed
- Always store important data in the mapped volumes:
- Use
/workspacefor development files - Save model outputs to the mapped output directory
- Keep source code changes in the mapped ai_worker directory
- Store downloaded models in the huggingface cache
- Use
Container Management
Initial Setup
bash# Clone the repository cd ~/ # or your preferred directory git clone -b jazzy https://github.com/ROBOTIS-GIT/ai_worker.git cd ai_workerContainer Operations
bash# Start container ./docker/container.sh start # Enter running container ./docker/container.sh enter # Stop container ./docker/container.sh stop
Docker Command Guide
The container.sh script provides easy container management:
Available Commands
help: Display help messagestart: Start containerenter: Enter running containerstop: Stop container
Usage Examples
./container.sh help                 # Show help
./container.sh start                # Start container
./container.sh enter                # Enter container
./container.sh stop                 # Stop container
Accessing the Robot PC via SSH
AI Worker supports mDNS, allowing you to connect without manually checking the IP address.
Connect the SBC (robot PC) to the same network as your user PC using a LAN cable.
On your user PC terminal, use the following command to connect via SSH:
ssh robotis@ffw-SNPR48A0000.local(Replace SNPR48A0000 with the serial number printed on the back of the robot body.)